Chapter 3 Installation, Sign-In, and Your First Bot
Confirm your subscription includes Bot entitlements, otherwise there is no entry point; if sign-in enters a loop, check your privacy settings. Avoid creating unconstrained "all-purpose assistants" that waste weekly quota in vain.
- Install desktop and mobile clients, and troubleshoot sign-in errors
- Create a dedicated Bot and fill in the six-line contract
- Dispatch the first file-saving task and verify against the checklist
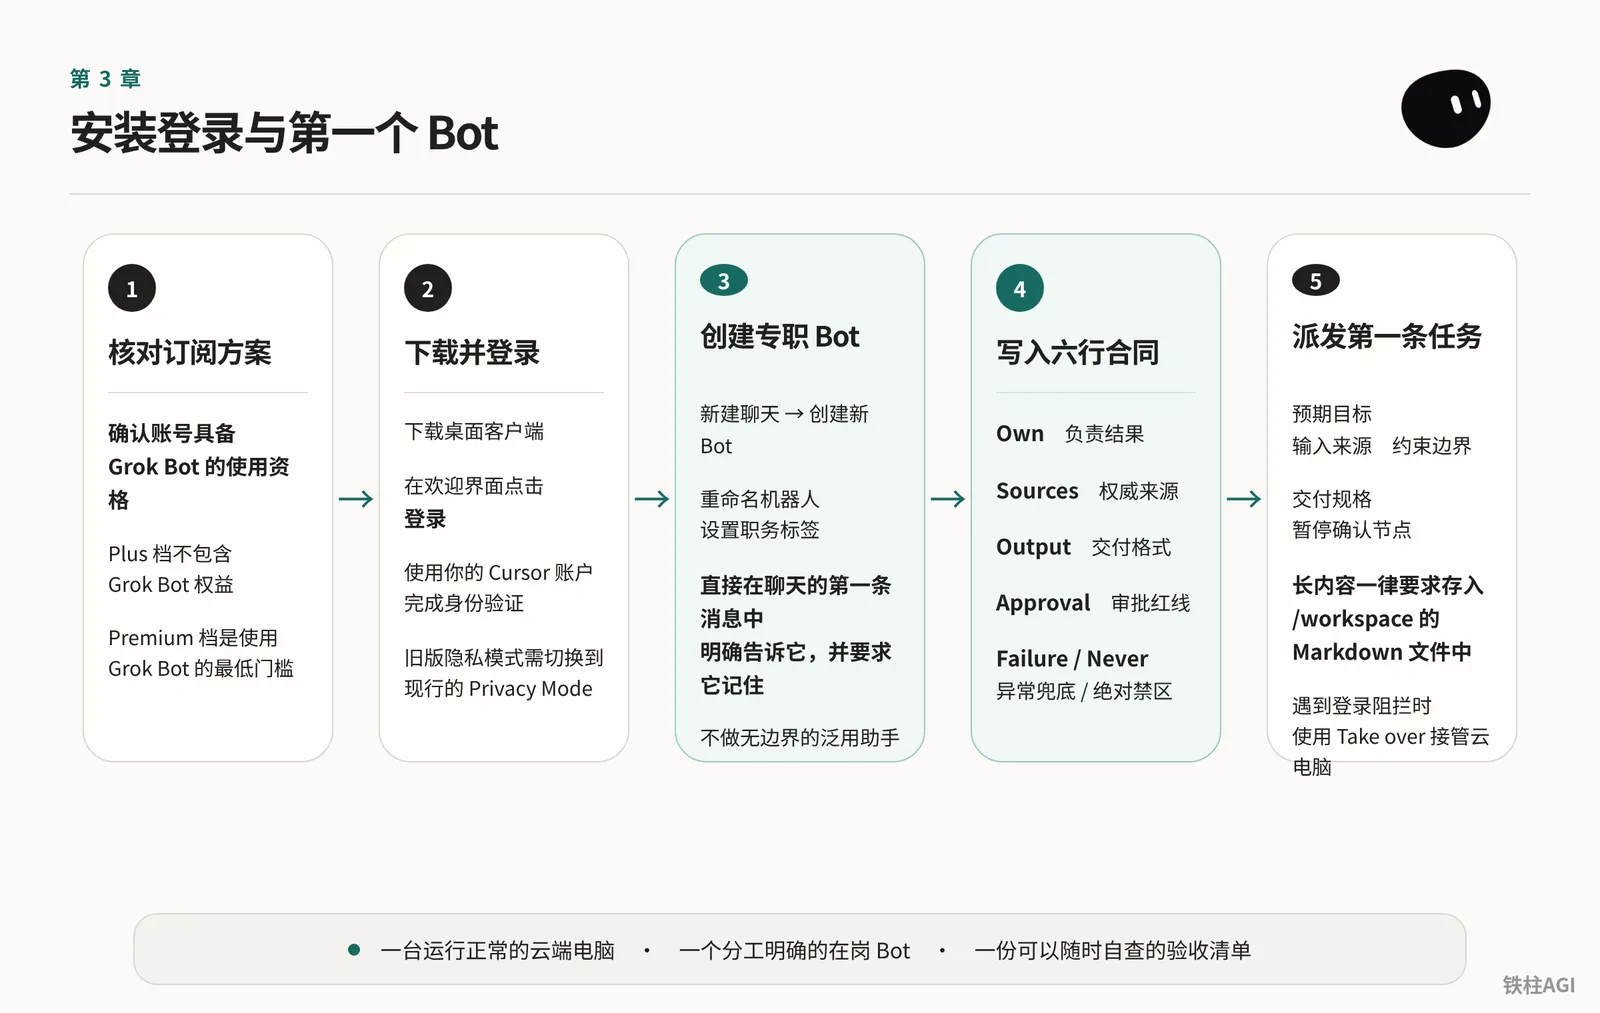
Subscription Plan Verification and Access Requirements
Check your account eligibility before downloading; Grok Bot requires an active subscription to be used.
| Plan Name | Price | Includes Grok Bot | Quota Details |
|---|---|---|---|
| The X Plus | $8 / month | No | Standard model chat only, no Bot access |
| The X Premium | $30 / month ($300 billed annually) | Yes | 4x quota, lowest barrier to entry for individuals |
| The X Super | $100 / month ($1000 billed annually) | Yes | 15x quota |
| The X Ultra | $200 / month ($2000 billed annually) | Yes | 50x quota |
| Cursor Pro / Pro+ / Ultra | See official website pricing | Yes | Provides weekly quota based on tier |
| Cursor Teams (Self-serve seats) | See official website pricing | Yes | Members share team quota |
- The $8/month Plus tier does not include Bot entitlements; buying it will not grant access.
- X-linked quotas and Cursor subscription quotas do not stack; system billing automatically calculates based on whichever provides the higher weekly quota.
For underlying infrastructure mechanisms of the plans, refer to the community articles "1.1 What Is Grok Bot: A One-Page Guide" and "Comprehensive Guide | Grok Bot from Zero to Getting Started Part 1".
Desktop Client Download and Installation
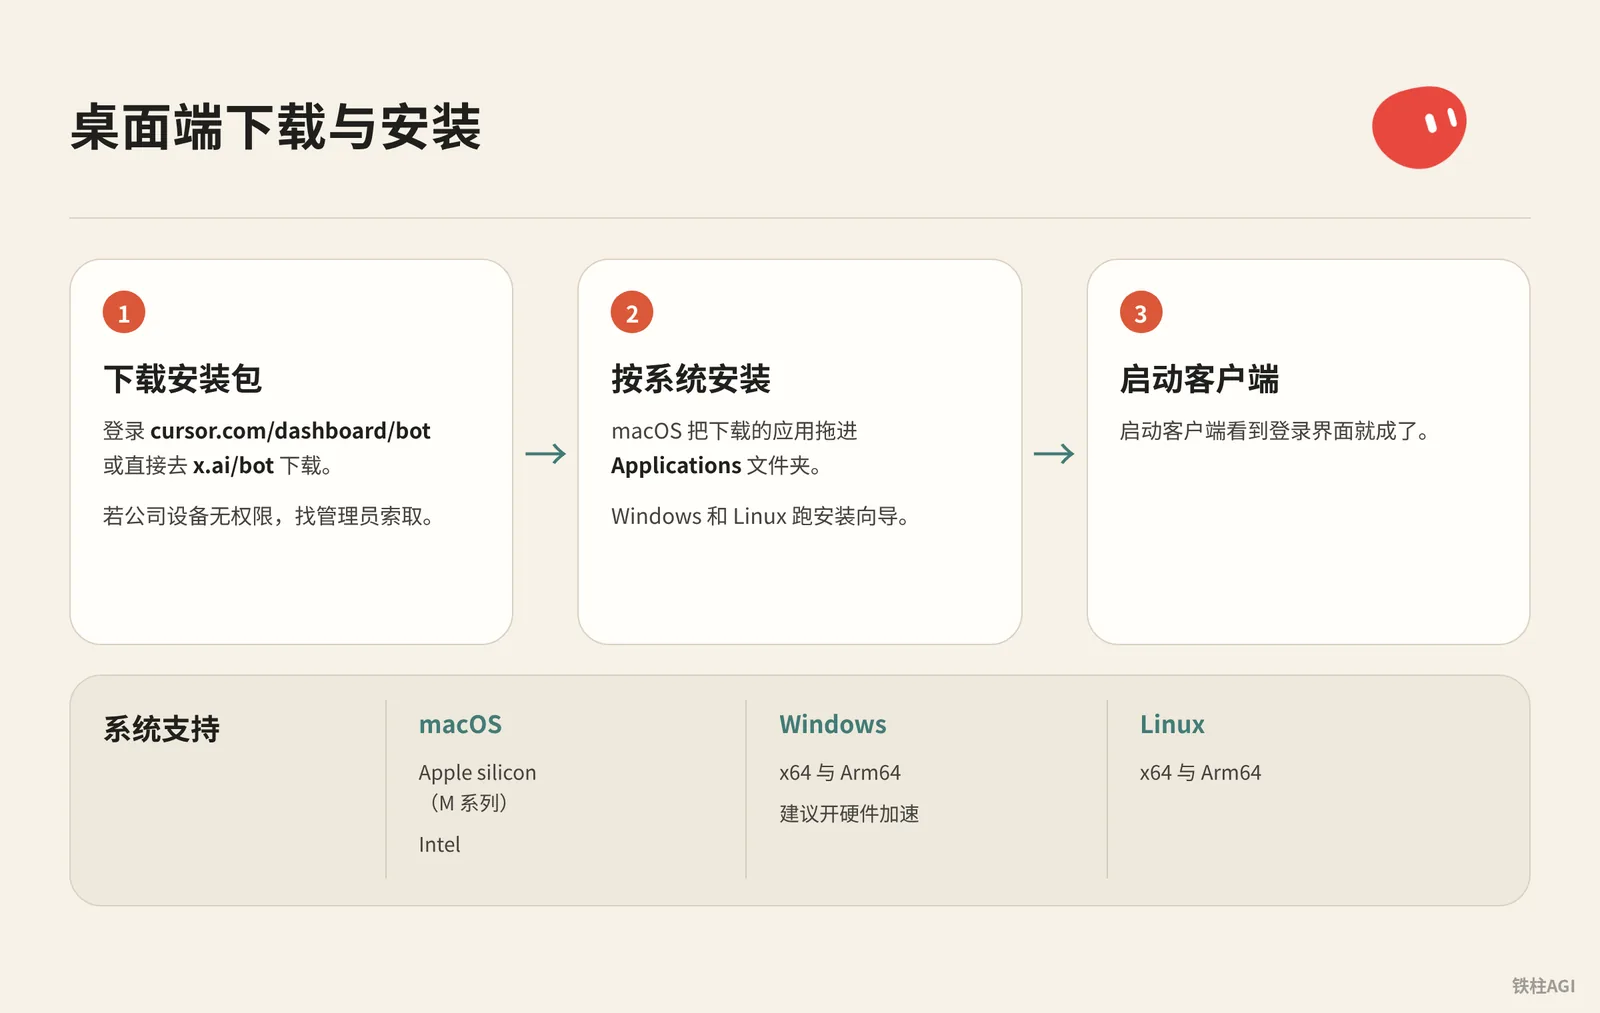
macOS supports Apple silicon (M series) and Intel, while Windows and Linux support x64 and Arm64 (hardware acceleration is recommended on Windows).
- Log in to
cursor.com/dashboard/botor go directly tox.ai/botto download the installer. If you lack permissions on a corporate device, contact your administrator. - On macOS, drag the downloaded application into the
Applicationsfolder; on Windows and Linux, run the setup wizard. - Launch the client; once you see the sign-in screen, you are good to go. For specific instructions, refer to the documentation Grok Bot Quick Start.
Account Sign-In and Privacy Mode Configuration
- Launch the client and click Sign In. Authenticate directly with your Cursor account in the browser, and enterprise SSO will automatically apply; for Grok Business seats, select Sign in with Grok to log in.
- Once authentication is complete, open the client "Settings"; if you see your account email and plan status, the setup succeeded.
Privacy Mode (Legacy) must be switched to the current Privacy Mode to proceed. Individual users can simply click confirm in the pop-up modal; team members need an administrator to update it in Team Settings.
For detailed instructions, refer to the official documentation Onboarding and Sign In to Grok Bot.
Common Sign-In Issues and Troubleshooting
Blindly reinstalling won't help; issues are mostly related to cache or session refreshes.
- Upgrade the client to the latest version and sign in again.
- Clear cookies for
cursor.comandx.ai, or use incognito/private mode. - Log in to
x.ai/botto verify that the web client can establish a session. - If you just changed your subscription, leave it and wait 30 to 60 minutes; errors should disappear after refreshing.
Multiple consecutive failed phone verifications will trigger a risk-control lock that cannot self-recover. If troubleshooting fails or you encounter OAuth errors, submit a ticket on the support page, attaching your email and screenshots, and stating the version and steps taken.
See Sign In to Grok Bot for details.
iOS Mobile Installation and Cross-Device Collaboration
Installation and Sign-In
- Requires iOS 18 or higher.
- Search for Grok Bot on the App Store to install, and sign in with the same Cursor account for automatic sync—no duplicate payment required.
Cross-Device Division of Responsibilities
- The mobile client is ideal for daily monitoring: you can view the live screen, take over control (Take over) to enter verification codes, handle approvals (Allow / Deny), or start and stop Routines.
- In-depth operations must be performed on the desktop client: screen recording up to 10 minutes to teach tasks (Teach a task), testing Routines (Test run), and cloud machine maintenance (Update / Recover).
Notification Management
- Mute an individual Bot: In the chat page, tap the name at the top to toggle off Notifications; it can also be disabled when sending messages on desktop.
- Disable globally: Turn off notification permissions for Grok Bot in system "Settings".
See Mobile Grok Bot for details.
Understanding the Shared Infrastructure and Creating Your First Bot
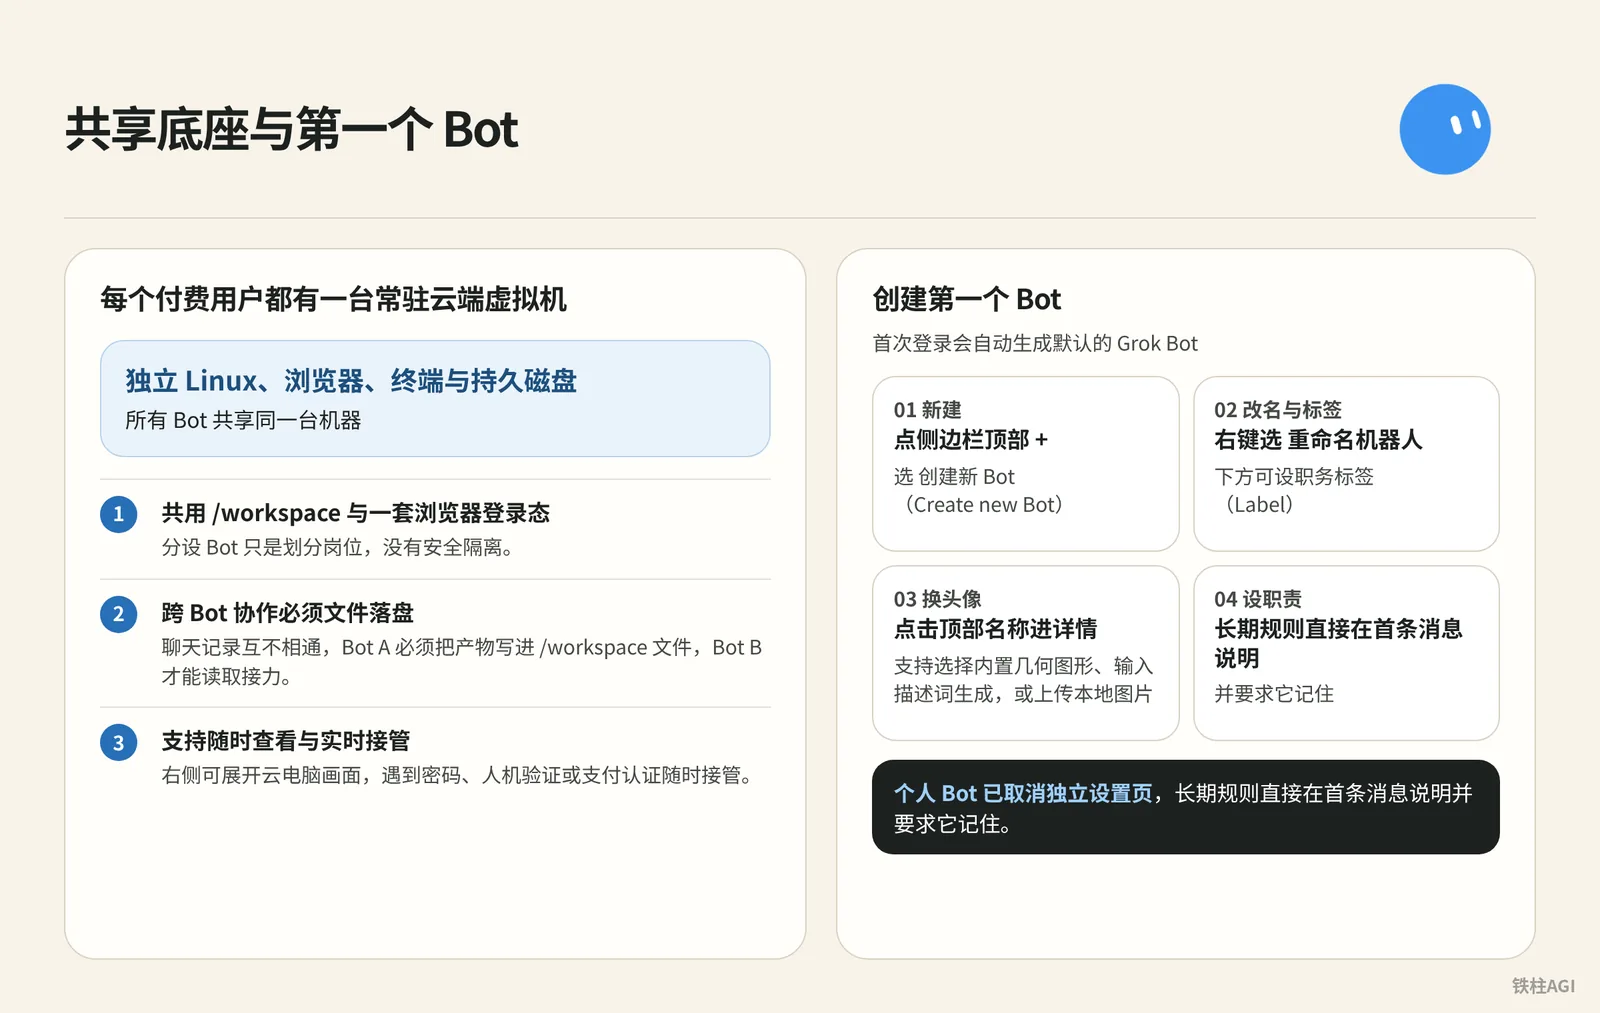
Every paid user has an always-on cloud virtual machine equipped with an independent Linux environment, browser, terminal, and persistent disk (early testing configuration was around 8 cores and 16 GB RAM, unverified; refer to official specifications).
This machine has three physical boundaries that directly impact operations:
- All Bots share the same machine: They share
/workspaceand a single browser session/login state; setting up separate Bots merely divides roles, without security isolation. - Cross-Bot collaboration requires file persistence: Chat histories are isolated from each other; Bot A must write deliverables into
/workspacefiles before Bot B can read and take over. - View anytime and take over in real time: The cloud machine screen can be expanded on the right side; take over at any time when encountering passwords, CAPTCHAs, or payment authentications—never type credentials into the input box.
Upon first login, a default Grok Bot is automatically created. Steps to manually create and configure a new one are as follows:
- Create: Click + at the top of the sidebar (or Cmd+N) and select Create new Bot. You can also enter a name in the input box first and click to create directly.
- Rename and Label: Right-click and select Rename Bot, or click the name at the top to expand the panel and edit. Below, you can set a role label (Label; displayed as Title (optional) on mobile).
- Change Avatar: Click the top name to enter details and click the avatar; it supports selecting built-in geometric shapes, generating via descriptive prompts, or uploading a local image under 25 MB (mobile allows selecting from photos, generating, or removing).
- Set Responsibilities: Individual Bots no longer have an independent settings page; state long-term rules directly in the first message and instruct it to remember them. Team Bots still retain a dedicated description field in the "About" section of details.
- Change Bot Name, Avatar, and Responsibilities
- "10,000-Word Guide | Grok Bot from Entry to Mastery | Jin Chenma"
Writing Responsibilities: The Standard Six-Line Contract
Contract Structure and Template
Beginners should avoid vague titles—write the six core constraints directly into the first message and have it remember them as long-term rules.
- Own (Responsible for results): Clarify the specific metrics it is accountable for long-term; do not make it a general-purpose assistant.
- Sources (Authoritative sources): Restrict to official websites or designated links only; prohibit the use of unverified sources.
- Output (Delivery format): Specify save paths, naming conventions, and summary word counts.
- Approval (Approval red lines): High-risk actions such as sending emails, submitting forms, or deleting files must pause and wait for manual pop-up approval.
- Failure (Fallback handling): When encountering broken links or missing data, clearly label them as such; making assumptions or speculating is strictly forbidden.
- Never (Absolute red zones): Modifying source files is prohibited; summarizing from memory is prohibited; clicking payment buttons is prohibited.
Once the Bot is named, replace the template fields and send it directly.
Contract Structure and Template
请牢记你的长期工作职责,在今后的工作中始终遵循以下要求:

Own: 负责监控目标清单的每周功能与定价变动,输出结构化对比材料。
Sources: 仅限使用目标官方网站的定价页、Changelog 页面以及我通过附件提供的官方说明文档。
Output: 提炼核心动态,附带核对日期与原始出处链接,长文本与数据表格必须保存至 /workspace/research/ 下的 Markdown 文件中,对话框中只发简要完成汇报。
Approval: 涉及发送任何邮件、对外发帖、提交表单、删除文件或进行任何费用支付前,必须停下来等待我的人工批准。
Failure: 若目标页面无法访问或内容缺失,在报告中明确标注为“未取得一手数据”,严禁推测或编造任何功能与价格。
Never: 严禁修改我上传的任何源文件,在源系统可访问时严禁依赖自身训练记忆进行主观概括。

今后的工作中请记住这些要求。
Practical Case Studies
In "10,000-Word Guide | Grok Bot from Entry to Mastery | Jin Chenma", Jin Chenma strictly separates long-term responsibilities from one-off requirements.
Long-term rules govern sources and deliverables, while current messages only assign specific research topics; explicitly state if first-hand data is missing, and never guess figures.
In "Comprehensive Guide | Grok Bot from Zero to Getting Started Part 1", Today established safety boundaries, isolating read-only actions from operations with external consequences.
Research only one competitor at a time with public source links attached, distinguish facts from speculation, and always pause for confirmation when sign-in or payment is involved.
For evolution rules, see "1.1 What Is Grok Bot: A One-Page Guide".
Dispatching Your First Real Task
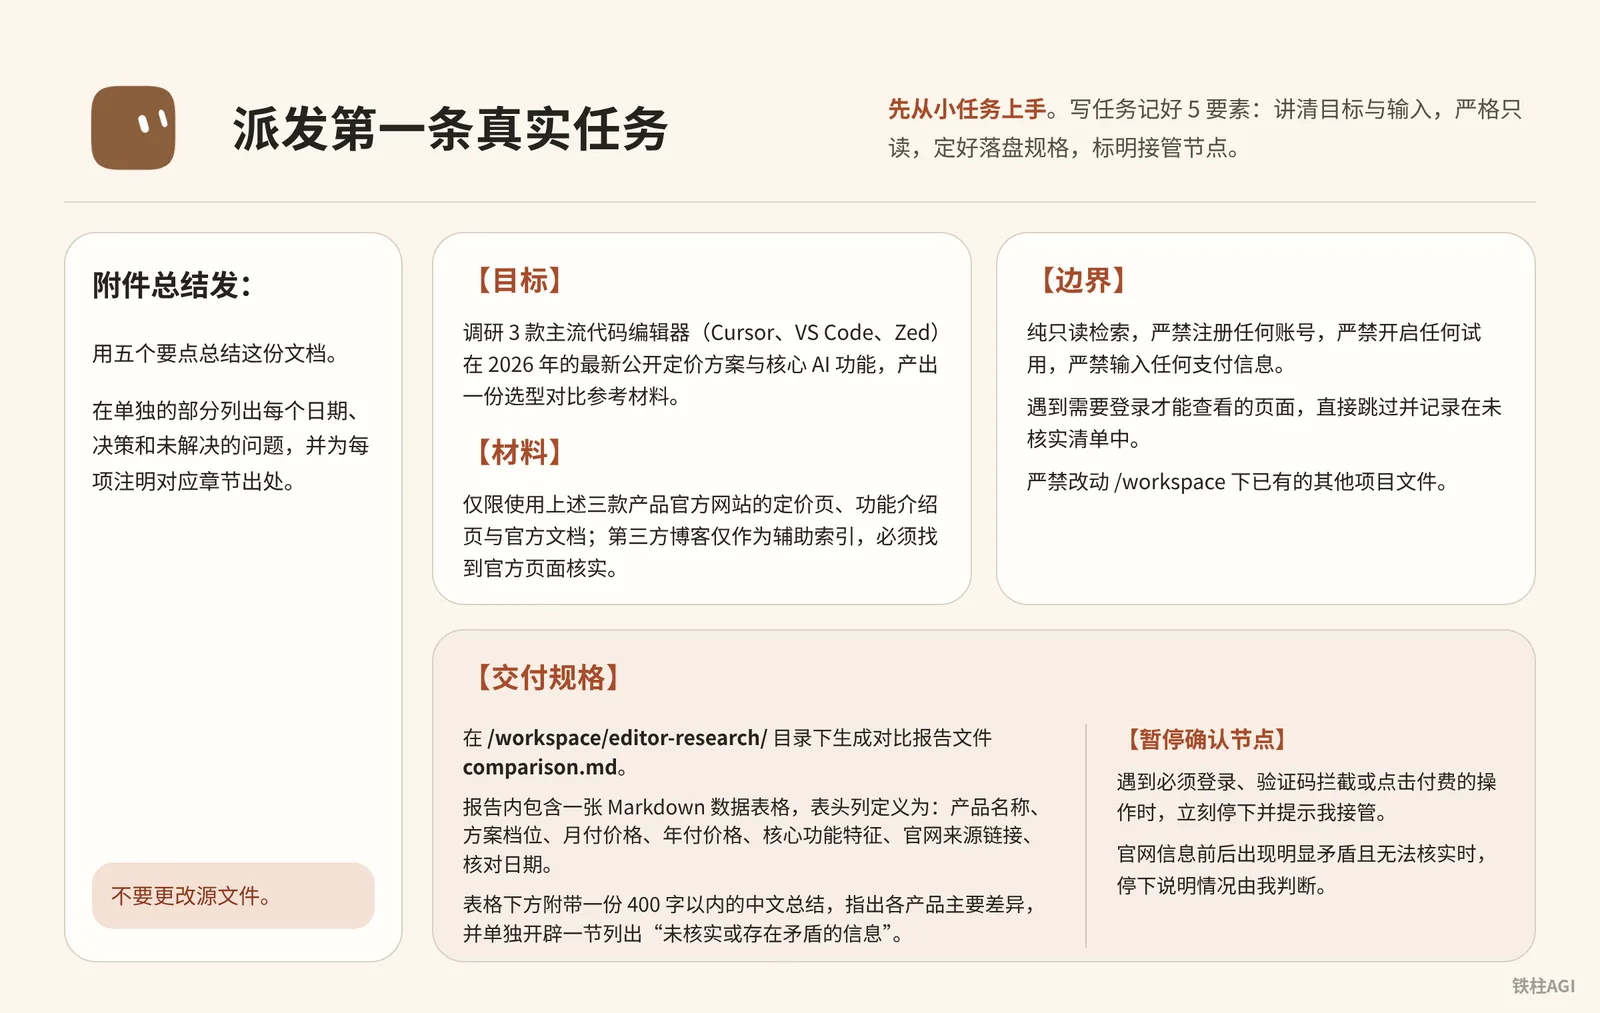
Start with small tasks. Keep the 5 elements in mind when writing tasks: clarify goals and inputs, enforce strict read-only mode (prohibit modifying source files, registrations, and payments), define file-saving specifications, and clearly mark handover checkpoints.
To summarize an attachment, send:
用五个要点总结这份文档。
在单独的部分列出每个日期、决策和未解决的问题,并为每项注明对应章节出处。
不要更改源文件。
To research competitor pricing and save to disk, send:
Dispatching Your First Real Task
【目标】
调研 3 款主流代码编辑器(Cursor、VS Code、Zed)在 2026 年的最新公开定价方案与核心 AI 功能,产出一份选型对比参考材料。

【材料】
1. 仅限使用上述三款产品官方网站的定价页、功能介绍页与官方文档;第三方博客仅作为辅助索引,必须找到官方页面核实。
2. 记录每一项数据的原始官方 URL 与数据核对日期。

【边界】
1. 纯只读检索,严禁注册任何账号,严禁开启任何试用,严禁输入任何支付信息。
2. 遇到需要登录才能查看的页面,直接跳过并记录在未核实清单中。
3. 严禁改动 /workspace 下已有的其他项目文件。

【交付规格】
1. 在 /workspace/editor-research/ 目录下生成对比报告文件 comparison.md。
2. 报告内包含一张 Markdown 数据表格,表头列定义为:产品名称、方案档位、月付价格、年付价格、核心功能特征、官网来源链接、核对日期。
3. 表格下方附带一份 400 字以内的中文总结,指出各产品主要差异,并单独开辟一节列出“未核实或存在矛盾的信息”。
4. 对话框中仅需回复已完成落盘的简短提示及文件绝对路径。

【暂停确认节点】
1. 遇到必须登录、验证码拦截或点击付费的操作时,立刻停下并提示我接管。
2. 官网信息前后出现明显矛盾且无法核实时,停下说明情况由我判断。
When encountering sign-in, 2FA, or slider CAPTCHAs:
- Click Take over to handle manually; once done, click I'm done to continue, or click Skip to bypass.
- After completion, confirm that
/workspace/editor-research/comparison.mdis saved completely.
For specifications, see Using Grok Bot and Onboarding.
Common Pitfalls
- The $8 Plus tier does not include Bot access; you must choose the $30/month Premium tier.
- All Bots share the cloud machine and quota; get one working properly first instead of creating dozens that conflict with each other.
- Do not send passwords or API keys in chat; use Take over to input credentials or fill in security cards.
- Always save long text into Markdown files in
/workspaceto prevent context window pollution. - Do not reinstall if you encounter sign-in errors; clear cookies for
cursor.comandx.ai, or wait 30 to 60 minutes. - Different Bots share the virtual machine and browser session; permissions cannot be isolated.
- Teach a task, Test run, and system recovery are exclusive to the desktop client and unavailable on iOS.
Post-Task Acceptance Checklist
- Go to Usage & Billing; confirm the paid tier is active and usage metrics are normal.
- The right-hand screen on the desktop client launches properly without Reconnecting errors.
- Sign in to the same Cursor account on iPhone (iOS 18+); verify there is no prompt for a duplicate purchase.
- Send the six-line contract; the Bot explicitly confirms it has remembered the long-term rules.
- Target files are generated in
/workspaceon the cloud machine according to instructions. - When encountering actions like sign-in, the Bot proactively pauses and displays an Action needed card.
- Deliberately feed broken links; the report clearly notes "Did not obtain first-hand data" instead of hallucinating.
Further Reading
Related Chapters
- Chapter 4 Assigning Tasks: Messages, Attachments, and Effective Hand-Offs
- Chapter 25 Frequently Asked Questions and Troubleshooting
Official Pages
- Grok Bot Quick Start (Get Started)
- Onboarding (Onboarding)
- Sign In to Grok Bot (Sign In)
- Mobile Grok Bot (Mobile)
- Change Bot Name, Avatar, and Responsibilities (Edit Bot)